
Delphi is one of those tools many developers have heard of but never tried. Yet it still runs a surprising amount of the world’s business software: accounting systems, point-of-sale apps, hospital and school systems, and many of the Windows tools you see on office desks.
In this guide you’ll learn what Delphi is, where it’s used, how to install the free Community Edition, and how to build your first working app in about 15 minutes. No previous Delphi experience needed.
This is part 1 of the Learn Delphi series on SimplifyDatabase.com. The series starts with the language and ends with real database work against SQL Server.
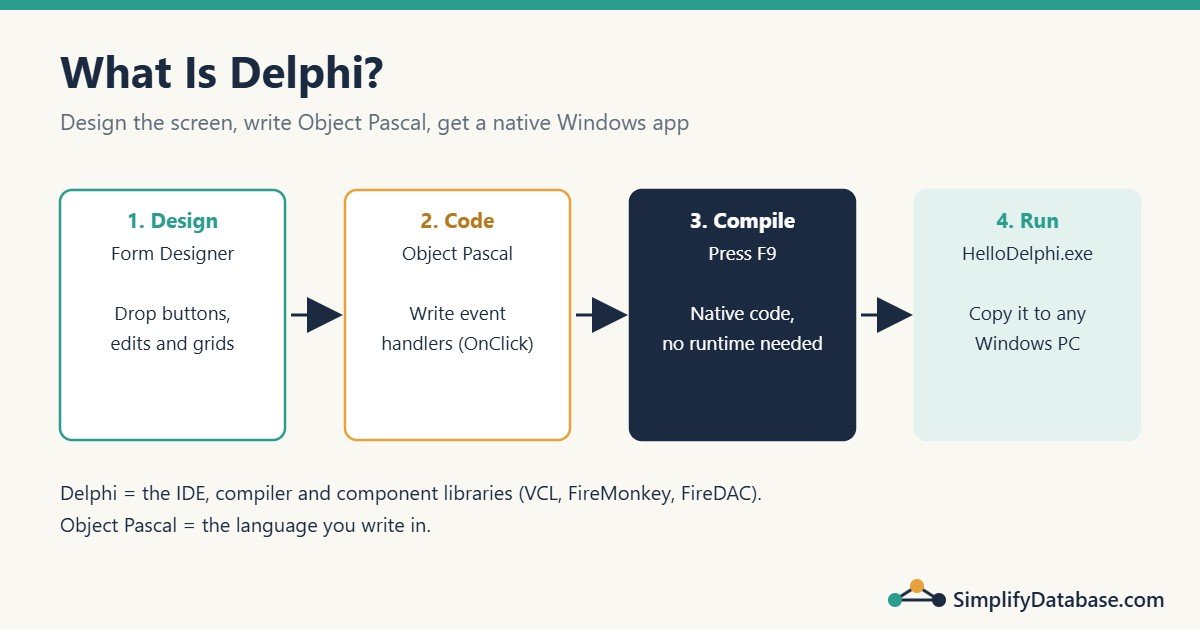
What Is Delphi?
Delphi is a development environment (an IDE) and a programming language for building native applications, mainly for Windows. It’s made by Embarcadero and is part of a bigger product called RAD Studio.
Two words matter here:
- Delphi is the product: the IDE, the compiler, the visual form designer and the component libraries.
- Object Pascal is the language you write in. When people say “Delphi code”, they mean Object Pascal.
Delphi is a RAD tool (Rapid Application Development). You design screens by dropping buttons, grids and text boxes onto a form, set their properties with the mouse, and then write the code that runs when something happens, such as a button click.
Delphi compiles your program into a native .exe file. There’s no runtime to install and no interpreter. You copy the .exe to another Windows PC and it runs.
What Is Delphi Used For?
| Area | Typical Delphi apps |
|---|---|
| Business software | Accounting, ERP, inventory, payroll, fixed asset systems |
| Database front ends | Data entry screens, reports and search screens over SQL Server, Oracle, MySQL or InterBase |
| Desktop tools | Utilities, file managers, installers, admin consoles |
| Cross-platform apps | Windows, macOS, Android and iOS apps with the FireMonkey (FMX) framework |
| Back-end services | Windows services, REST servers, scheduled data sync jobs |
The strongest area is still database-driven business apps on Windows. That’s why Delphi fits a database site like this one: a big part of real Delphi work is reading and writing data in SQL Server.
Why Learn Delphi Today?
- Lots of existing systems. Many companies run Delphi apps written 10 to 25 years ago, and they need people who can maintain and improve them.
- Fast results. You can build a working data entry screen in an afternoon.
- Readable language. Object Pascal reads almost like English (
begin,end,if ... then). It’s a good first language. - Native speed. Compiled Delphi apps start fast and use little memory.
To be fair: Delphi is a smaller market than C#, Java or Python, and the paid editions are expensive. Learn it if you work with Delphi systems, want to, or just want a fast way to build Windows database tools.
Delphi Editions: Which One Do You Need?
| Edition | Cost | Good for |
|---|---|---|
| Community | Free (1-year license, renewable) | Learning, hobby projects, very small businesses |
| Professional | Paid | Commercial desktop and mobile apps |
| Enterprise / Architect | Paid, higher | Client/server database apps (SQL Server, Oracle, etc.) with FireDAC, multi-tier apps |
Key points about the Community Edition (check Embarcadero’s FAQ, as the terms can change):
- It’s free for individuals and for companies with less than US$5,000 in yearly revenue, and up to 5 developers.
- The license is for one year. After that, you download the latest version and register again.
- It includes the full IDE, compiler, debugger and visual designers.
- Remote client/server database access with FireDAC (for example to SQL Server) is an Enterprise feature. For learning SQL Server from Delphi on Community Edition, the database articles in this series also show the ADO (dbGo) components as an alternative.
At the time of writing, the current Community Edition is Delphi 13 Florence.
How to Install Delphi Community Edition
- Go to the Embarcadero website and open the Delphi Community Edition page.
- Fill in the form with your name and email and download the installer. You’ll receive a serial number by email. Keep it.
- Run the installer and enter the serial number when asked.
- Choose the platforms. As a beginner, select Windows only. You can add Android or macOS later. Fewer platforms means a faster install.
- Leave the default options for languages and help. Wait for the install to finish (it can take 20 to 40 minutes).
- Start Delphi (it may appear as “RAD Studio” in the Start menu).
Tip: Install Delphi on an SSD with at least 30 GB free. The IDE, help and libraries take a lot of space.
A Quick Tour of the IDE
When you open Delphi, you’ll see a Welcome page. The important areas are:
| Area | What it does |
|---|---|
| Form Designer | The window you’re building. Drag components onto it. |
| Tool Palette | The list of components: buttons, labels, edits, grids, database components. |
| Object Inspector | Properties (like Caption, Width, Color) and Events (like OnClick) of the selected component. |
| Structure | A tree of the components on your form. |
| Projects window | The files in your project. |
| Code Editor | Press F12 to switch between the form and its code. |
Build Your First App: A Simple Greeting Form
You’ll build a small window with a text box and a button. You type your name, click the button, and the app greets you.
Step 1: Create a New VCL Application
Choose File > New > Windows VCL Application – Delphi.
VCL (Visual Component Library) is Delphi’s framework for Windows apps. You’ll see an empty form called Form1.
Save the project straight away with File > Save All:
- Save the unit as
MainForm.pas - Save the project as
HelloDelphi.dproj
Step 2: Add Components
From the Tool Palette (you can type the name into its search box), drag these onto the form:
- A TLabel. In the Object Inspector set
CaptiontoYour name: - A TEdit. Set
NametoedtNameand clear itsTextproperty. - A TButton. Set
NametobtnGreetandCaptiontoSay hello. - A second TLabel. Set
NametolblResultand clear itsCaption.
Also select the form itself and set its Caption to My First Delphi App.
Naming tip: Give components short prefixed names (
edt,btn,lbl).edtNameis much easier to read in code thanEdit1.
Step 3: Write the Click Event
Double-click the button on the form. Delphi creates an empty event handler and jumps to the code editor. Fill it in like this:
procedure TForm1.btnGreetClick(Sender: TObject);
var
  UserName: string;
begin
  UserName := Trim(edtName.Text);

  if UserName = '' then
  begin
    ShowMessage('Please type your name first.');
    edtName.SetFocus;
    Exit;
  end;

  lblResult.Caption := 'Hello, ' + UserName + '! Welcome to Delphi.';
end;
What the code does:
var UserName: string;declares a local variable.:=is the assignment operator. A single=is used for comparison.Trimremoves spaces at the start and end.- If the name is empty,
ShowMessageshows a small dialog,SetFocusputs the cursor back in the text box, andExitleaves the procedure. - Otherwise the result label shows the greeting.
Step 4: Run It
Press F9 (or click the green Run arrow). Delphi compiles the project and starts your app. Type a name, click Say hello, and you’ll see the greeting.
Close the app to return to the IDE.
Congratulations: you’ve built a native Windows program. Look in your project folder under Win32\Debug (or Win64\Debug) and you’ll find HelloDelphi.exe.
What Are the Files in a Delphi Project?
| File | What it is |
|---|---|
HelloDelphi.dpr | The main program file. It starts the application and creates the forms. |
HelloDelphi.dproj | Project settings (platforms, build options). |
MainForm.pas | The unit: your Object Pascal code for the form. |
MainForm.dfm | The form layout: components and their properties. |
Win32\Debug\HelloDelphi.exe | The compiled program. |
Keep .dpr, .dproj, .pas and .dfm files in source control. Don’t commit the Win32/Win64 output folders or __history folders.
A First Look at Object Pascal
Here’s the full unit Delphi generated for you, with your event handler inside it:
unit MainForm;

interface

uses
  Winapi.Windows, System.SysUtils, System.Classes,
  Vcl.Controls, Vcl.Forms, Vcl.Dialogs, Vcl.StdCtrls;

type
  TForm1 = class(TForm)
    Label1: TLabel;
    edtName: TEdit;
    btnGreet: TButton;
    lblResult: TLabel;
    procedure btnGreetClick(Sender: TObject);
  end;

var
  Form1: TForm1;

implementation

{$R *.dfm}

procedure TForm1.btnGreetClick(Sender: TObject);
begin
  // your code from Step 3
end;

end.
You don’t need to understand everything yet. The main ideas:
- A unit has two parts:
interface(what other units can see) andimplementation(the actual code). useslists the other units this unit needs.TForm1 = class(TForm)declares your form as a class that inherits fromTForm.- Blocks of code sit between
beginandend. Statements end with a semicolon. //starts a comment.
The next articles in this series cover each of these ideas one by one.
Common Beginner Mistakes
- Using
=instead of:=.x = 5compares;x := 5assigns. - Forgetting to save the project first. Delphi then saves files as
Unit1.pasandProject1.dprojin a default folder, which gets messy fast. - Leaving default names.
Button1,Button2andEdit3make the code hard to read. Rename components before writing code. - Typing an event handler by hand. Create events by double-clicking the component or the event in the Object Inspector. Otherwise the form and code can get out of sync.
- Installing every platform. Start with Windows only.
Practice Exercises
Exercise 1. Add a second button called btnClear that empties the text box and the result label.
Exercise 2. Make the greeting also work when the user presses Enter in the text box.
Exercise 3. Show how many characters the name has, for example Hello, Sara! Your name has 4 letters.
Answers
Exercise 1:
procedure TForm1.btnClearClick(Sender: TObject);
begin
  edtName.Clear;
  lblResult.Caption := '';
  edtName.SetFocus;
end;
Exercise 2: select btnGreet and set its Default property to True. A default button is “clicked” when the user presses Enter on the form.
Exercise 3:
lblResult.Caption := 'Hello, ' + UserName + '! Your name has ' +
  IntToStr(Length(UserName)) + ' letters.';
Length returns the number of characters, and IntToStr turns the number into text so you can join it to the other strings.
Summary
- Delphi is an IDE and Object Pascal is its language. It builds native apps, mostly for Windows.
- It’s widely used for database-driven business software.
- The free Community Edition is enough to learn the language and build desktop apps.
- A Delphi app is built from forms (
.dfm) and units (.pas). You drop components on a form and write event handlers. :=assigns,=compares, and code blocks go betweenbeginandend.
Next in the series: Delphi basics: variables, data types, if/case and loops. You’ll find every part of the series in the Delphi category.
Related articles
- How to Fix Query Timeout and Performance Issues in Delphi Applications Connected to SQL Server: what to do when your Delphi app gets slow against SQL Server.
- What Is a Database?: the basics you’ll need before connecting Delphi to data.
- How to Learn SQL: A Step-by-Step Roadmap for Beginners: the SQL side of Delphi database work.